Domain Keys and Sender Policy Framework Records Must be Set

SPF & DKIM are the wax seal of email
Your Highness. I’ve received your correspondence and am honored to respond. Oh!? How did I know it was you? Because the letter was sealed in melted wax embossed with your official seal. That’s how it worked in the year 1818. How does it work in 2018?
You probably didn’t realize this, but the internet has an authentication system to ensure an email that says it came from you actually came from you. Stop and think about that for a second. What if bad actors could spoof your email address and send emails pretending to be you. It would be disastrous. So, how does the internet authenticate emails that come from you?
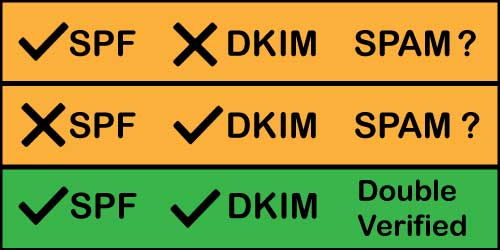
The internet uses two records in your DNS (Domain Name Servers) records to ensure you are who you say you are. You want both in place to improve your odds of staying out of the SPAM folder.
- Sender Policy Framework (SPF): A simple email validation system designed to detect email spoofing. It provides a mechanism to allow receiving mail exchanges to verify incoming email from a domain or IP address comes from an authorized host.
- DomainKeys Identified Mail (DKIM): A cryptographic authentication system where a private key is stored in your DNS records. This key is used to authenticate identity, as well as verify that the message hasn’t been modified or tampered with in transit.

You want both SPF & DKIM records to stay out of the SPAM folder
UPDATE: You also need to set a DMARC record. DMARC stand for Domain-based Message Authentication, Reporting, and Conformance. DMARC was established in 2012, but had been mostly optional until 2024.
Starting in February 2024, Gmail and Yahoo require that DMARC be configured. Otherwise, your marketing emails will be delivered to the SPAM folder.
Do you want to stay out of the SPAM folder? Absolutely. Here is what you need to do. Our primary example will be HubSpot, but this applies to any platform that sends email on your behalf.
Step 1: Check your SPF record
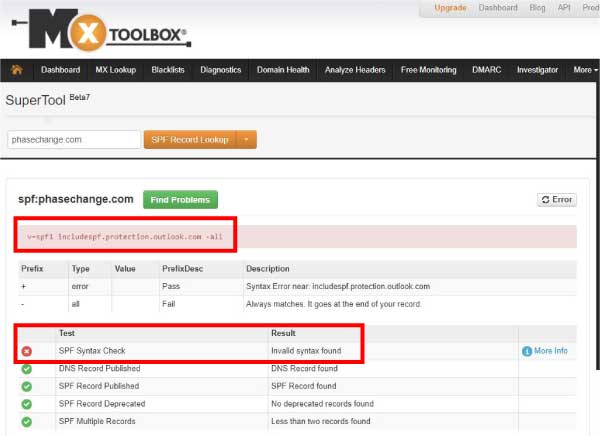
MxToolBox is an Austin-based company that provides several tools for testing email deliverability factors. You want to start with the SPF test. Here’s an example of an error. It is wrong for one reason we know and one reason we suspect.
- We can see there is a syntax error in the record (they need a colon after “include”)
- We suspect they’ve neglected to include other platforms they use to send email (Salesforce, MailChimp, Constant Contact, etc.)

A quick check reveals a syntax error in the SPF record
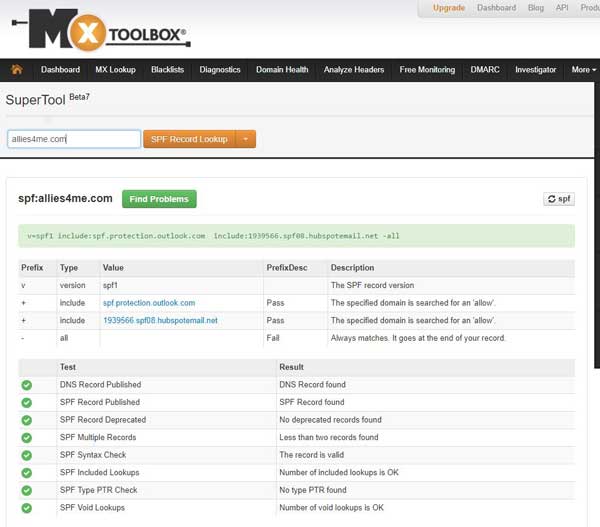
When you run the same test on the allies4me.com domain, you will see two platforms – Office 365 and HubSpot. You also see there are no syntax errors. We don’t send from MailChimp or any other platforms, so this is all we need in our SPF record.
Notice that the record is a single txt entry in the DNS record. Don’t enter a separate TXT record for each platform. They need to be in the same line.
v=spf1 include:spf.protection.outlook.com include:1939566.spf08.hubspotemail.net -all

There are two email sending platforms in this SPF record. Office 365 & HubSpot
Step 2: Check your DKIM Settings
DKIM gets a little more complicated. Your domain keys (DKIM) are part of the decryption key that determines if an email sent in your name is valid or not. So, there is no way to view these publicly. To make matters worse, each platform handles the domain keys a little differently.
MailChimp
- Navigate to “Profile” using the top-right navigation
- Under “Settings” select “Verified Domains”
- Next to “Authentication” click “View setup instructions”
- You will find the values for both DKIM and SPF
Office 365
- From the web interface, go to Admin center
- Expand “Admin centers” in the left vertical menu and click on “Exchange”
- Under “Protection” select DKIM
- Click on your emailing domain and on the right-hand side click to enable DKIM signatures
- Then read this article to find the correct syntax for your DKIM record
HubSpot
HubSpot is moving this setting, but at the time of writing this, go to Content Settings in the Marketing Portal. Go to Domain settings and at the bottom of the page you will find Email Sending Domains.
At first pass, ours looked properly configured as you can see in the following image.

The green bubble on the left gives the false impression the DKIM record is setup correctly
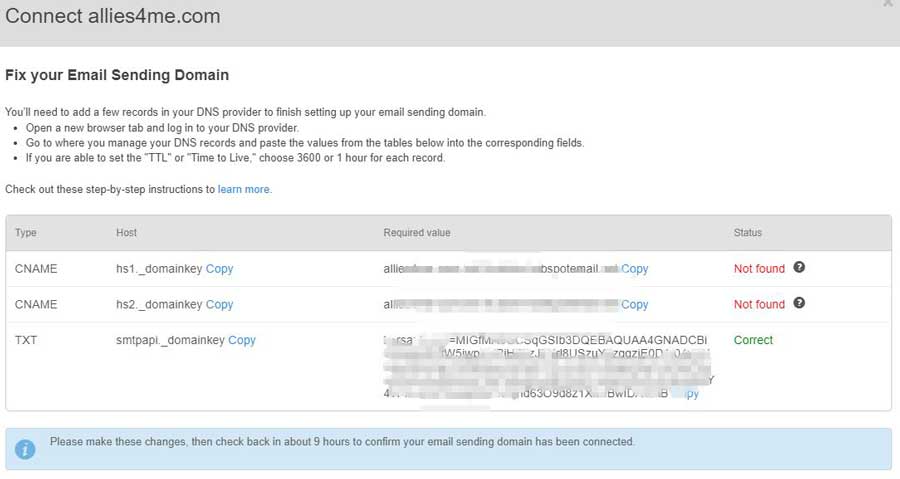
But when we clicked on “Details” we saw that we were missing some entries in our DNS record.

When you look closer, you realize that only one of the 3 DKIM entries is present
Once those were added, everything passed.
UPDATE: DMARC is Now a Requirement
Google and Yahoo announced that they are going to require DMARC settings beginning in February 2024. You’ve read how SPF and DKIM are two methods of authentication. DMARC is where you set the policy for emails that fail authentication. There are three options:
- None: Take no action on messages and deliver them normally.
- Quarantine: Mark messages as SPAM, and send them to the recipient’s SPAM folder, or to quarantine.
- Reject: Reject the messages, and don’t deliver them to recipients.
DMARC settings are configured in your DNS records. Like many DNS records, they’re a little cryptic to the untrained eye. But we’ll try to simplify it here. This is an example of a DMARC setting:
“v=DMARC1; p=quarantine; rua=dmarcreports@dmarc_handler.com”
The “v” and “p” fields are required. “p” is for policy, and you select one of the three options above. I prefer quarantine over “none,” because it is a stronger policy and is recognized by the email platforms as a stronger setting. I also prefer “quarantine” over “reject” because some email will still fail authentication and I’d rather it be in the SPAM folder than totally rejected.
The final field, rua, I the email address where reports are to be sent. The email address listed in the example is not a real address. It’s just an example. You should use a company like Valimail or MX Toolbox to handle your DMARC reporting. The “rua” filed is not required. But if you want to monitor performance, you need to have “rua” set to forward reports to a monitoring service.
Wrapping up
You obviously want your emails going to the Inbox and not the SPAM folder. But you probably didn’t know about these two important records. Set the SPF and DKIM records correctly to engage better with your customers, prospects, and anyone you want to get your emails.
Of course, your emails could be going to the SPAM folder because you have a reputation of sending SPAM. Change that by using our FREE email QA checklist. This checklist is the basis of our email campaigns that achieve twice the industry average open rate and 4x the industry average click rate. Staying out of the SPAM folder should be a constant focus of your email marketing efforts.
 Do you want to have high engagement on your marketing emails? Get our own internal email QA checklist that consistently delivers average open rates of 43% and average click rates of 10%
There are many reasons why your emails are getting in the spam folder: your IP address was used for spam, low open rates, your subscribers don’t remember you, low mailbox usage etc. Using an email validation tool before sending the email marketing campaign is god tier.