Google Analytics is an endless rabbit hole of measurement and segmentation capability. Your reward for journeying into this rabbit hole is insights that go well beyond sessions, bounce rates, and conversions. As you begin to harness this power, you will start to understand what visitors do leading up to conversions and purchases on your site. The better you understand your customer, the better you can refine your marketing to drive more business.

You don’t need to be a developer to use cookies
Do you want to know how many page views someone goes through before becoming a subscriber? You can do that! This is just one example. Start with a question and ask how Google Analytics can help you answer that question.
Your ability to set cookies is a critical element to answering a myriad of questions. What’s a cookie? It’s a tiny piece of information that’s deposited in your visitor’s browser that can be retrieved in future visits. You can also pull these cookies into your Google Analytics to create custom reporting that speaks to the behavior you’re tracking to answer the questions you’ve posed.
This post will show you how to set cookies using Google Tag Manager. Not using Google Tag Manager? It’s time to start. There are many reasons to start using it. Most fundamentally, it allows your marketing team to increase their measurement capability on your site without a developer.

Five Steps to Setting Cookies Using Google Tag Manager
- Create a cookie setter tag
- Add a tag that applies your cookie
- Add a custom variable for your cookie
- Verify everything is setup correctly
- Assign your cookie to a custom dimension or custom variable (Optional)
Follow these 5 steps and you can start setting custom cookies in the next 20 minutes. The code provided gives you two options. You can set a cookie that’s only valid for the current session. Or you can set a cookie that persists and is retrievable in future sessions.
Create a cookie setter tag
Log into your Google Tag Manager account and add a new tag with the following configuration:
- Name your new tag. We call ours “Cookie Setter”
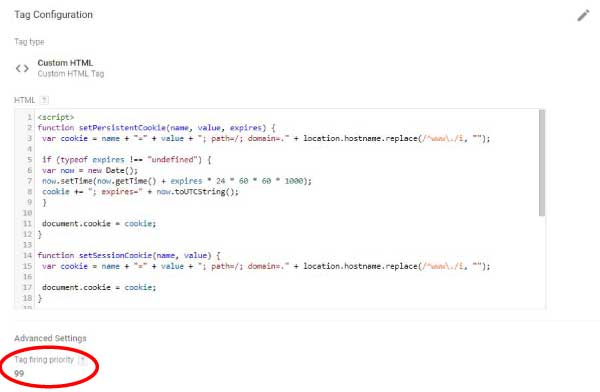
- Click on Tag Configuration and selection “Custom HTML”
- IMPORTANT: Make sure you set the Tag Firing Priority (under Advanced Settings) to a high value. This ensures your cookie setter code is available before you set the cookie with separate code.
- Add the code in the code block below
- Click on Triggering and select “All Pages.”
Create a custom HTML tag and add this code to set cookies from tag manager
<script>
function setPersistentCookie(name, value, expires) {
 var cookie = name + "=" + value + "; path=/; domain=." + location.hostname.replace(/^www\./i, "");
if (typeof expires !== "undefined") {
var now = new Date();
now.setTime(now.getTime() + expires * 24 * 60 * 60 * 1000);
cookie += "; expires=" + now.toUTCString();
}

document.cookie = cookie;
}

function setSessionCookie(name, value) {
var cookie = name + "=" + value + "; path=/; domain=." + location.hostname.replace(/^www\./i, "");

document.cookie = cookie;
}

function getCookie(name) {
var cookies = document.cookie.split(";"),
toReturn;

for (var i = 0; i < cookies.length; i++) {
var cookie = cookies[i].trim();
if (cookie.indexOf(name + "=") === 0) {
toReturn = cookie.substring((name + "=").length, cookie.length);
}
}

return toReturn;
}
</script>
Add a tag that applies your cookie
Now that the Cookie Setter code is in place, you can apply cookies to your heart’s content. Decide if you want the cookie to be persistent or non-persistent into future sessions. Call the appropriate cookie setter that gives you that outcome.
Example 1: Count total page-views across sessions
- Name your new tag. We call ours “Page View Count”
- Click on Tag Configuration and selection “Custom HTML”
- Don’t set Tag Firing Priority. It will default to 0 and ensure your cookie-setter code is ready first.
- Add the code in the code block below
- Click on Triggering and select “All Pages.”
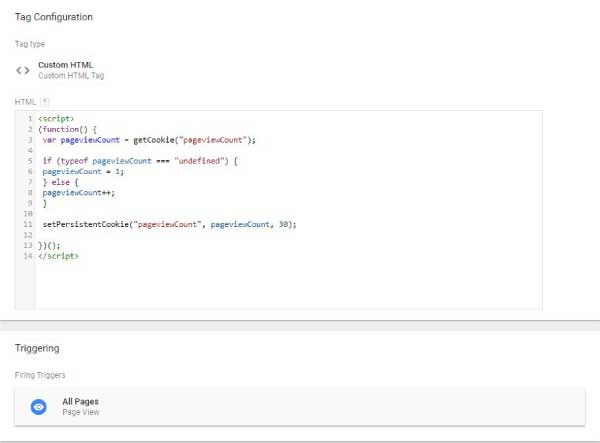
Add a custom HTML tag to insert your page view counter.
<script>
(function() {
 var pageviewCount = getCookie("pageviewCount");
if (typeof pageviewCount === "undefined") {
pageviewCount = 1;
} else {
pageviewCount++;
}</pre>
setPersistentCookie("pageviewCount", pageviewCount, 30);

})();
</script>
Example 2: Set a cookie when someone becomes a customer or subscriber
This is a powerful tool in your analytics. Do you want to know what happened in all the steps leading up to someone becoming a customer? Use this code to set a permanent cookie. Then used Advanced Segments in Google Analytics to exclude all sessions where the user wasn’t an active customer. Do you want to see what content they’re consuming after becoming a customer? Then setup a custom segment to only include that. Creating a persistent cookie enables this.
- Name your new tag. We call ours “Paid Customer”
- Click on Tag Configuration and selection “Custom HTML”
- Don’t set Tag Firing Priority. It will default to 0 and ensure your cookie-setter code is ready first.
- Add the code in the code block below
- Make a new trigger called “Paid Customer”. Set it to trigger only on thank-you pages after a payment’s been made.
- Apply the Paid Customer Trigger to the Paid Customer Tag

Add a trigger that triggers off of a payment thank you page.
<script>
var cookieName = "PaidCustomer";
var cookieValue = "true";</pre>
setPersistentCookie(cookieName, cookieValue, 365); // set for 1 year
</script>
Add a custom variable for your cookie
Now that your cookie is set, you want to be able to use it. Assign it to a custom variable in Google Tag Manager to be able to use it throughout Tag Manager. You can use this variable to trigger custom content based on page views if that’s the cookie being used. Or you can offer special deals to current customers if that’s the cookie being used. You can use this in many powerful ways depending on your needs.
Here are your steps to implement this:
- Click on “Variables” in Google Tag Manager
- Scroll to the bottom of the page. Under User-Defined Variables, click “New”
- Name your variable. In our example, we called it “Cookie-Page View Count”
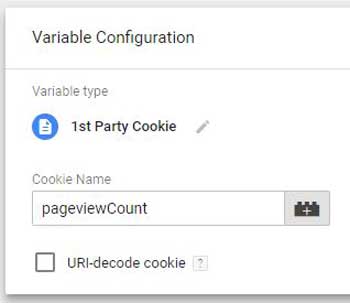
- Click on Variable Configuration and select “1st Party Cookie” under Page Variables
- Then insert the exact name of your cookie
- Hit Save and you’re done
Make sure your cookie name is exactly the same as what is in your code.
Verify everything is setup correctly
Now that you have everything setup, you should verify it is working how you expect. Put Google Tag Manager in preview mode (it’s the button next to submit). If you are using Chrome, you can inspect the cookies by right-clicking on your webpage and selecting “inspect.” From there, you should go through whatever process you are trying to cookie. Then monitor for the cookie being set.

You can see the PaidCustomer cookie is set to true. You can use this in future sessions.
You’ve done it! You’ve set a cookie based on user behavior. Congratulations!
Assign your cookie to a custom dimension or custom variable (Optional)
If you want to create Google Analytics reports based on your cookie, then you need to complete this last step. Pulling your cookie into Google Analytics allows you to create advanced segments and a reporting capability. This is where Analytics becomes ridiculously powerful. Do you want to know what someone does up to becoming a customer – but not after? You need to do this step. Pull your PaidCustomer cookie into Analytics and filter all visits AFTER they become a customer. On the flip side, do you want to know how someone behaves after becoming a customer? Then filter all visits BEFORE they become a customer.
Custom Dimension or Custom Variable? This is beyond the scope of this post, but make sure you answer that before proceeding. User, Session, Hit? Also beyond the scope of this blog post, but also important. Once you’ve decided those, then proceed as follows:
- Set your Custom Dimension or Metric in Google Analytics Admin section
- Assign your Custom Variable (from cookie) to your analytics tag
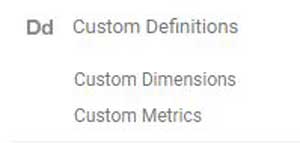
Start by going into the admin section of your Google Analytics account. Under the property column, click on Custom Definitions. Then click Custom Dimensions or Custom Metrics depending on what you want.
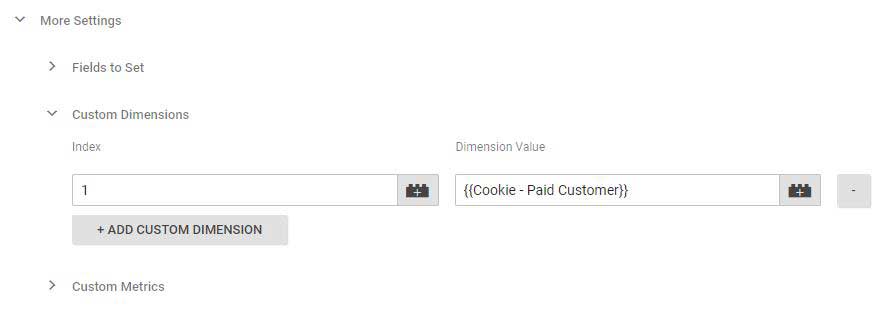
We created a custom dimension called “Paid Customer” and set the scope to “user.” At this point, you want to make a note of the Index number of your custom dimension or custom metric. Now go back to Tag Manager and edit your Google Analytics property. Click on “More Settings” and you will see where to add custom dimensions or custom metrics. Enter the index number that you got from Google Analytics and set the value to your 1st party cookie variable. You can click on the Lego block to find your 1st party cookie variable.
Hit save and publish. You’re done! Now you can start reporting in Google Analytics using cookie users and sessions to increase your understanding of user behavior.
NOTE: For some reason, the WordPress editor inserts “</pre>” into the code. This will cause an error. Please remove it if you see it.
Related Links:
How to Use HubSpot Reporting Dashboards to Hit Your Growth Goals
How to Use Advanced Sequences to Understand Your Customer’s Journey in Google Analytics
How to Keep Your Analytics from Betraying You – Ask the Right Questions (allies4me.com)
 New research shows that buyers and sellers are misaligned. Get the latest survey results from over 500 global companies.

Hi, Craig very helpful article as I am completely new to cookies and not very html savvy. I followed all the instructions, but to the point I click preview, it comes back with 2 errors:
Cookie Setter: Error at line 3, character 100: Parse error. ‘}’ expected
Paid Customer: Error at line 3, character 27: Parse error. primary expression expected
Could you please help?
Thankyou so much & have a lovely day.
Hi Rachel,
Sorry you’re having trouble with that. Sometimes WordPress behaves badly and makes its own edits.
Try replacing “” with “}” on line 3.
For the other error, just delete “”
Give that a shot and let me know if it works for you.
Hi Craig,
This is a great article and very helpful. It seems I’m having the exact same problem as Rachel. I tried the suggestion you outlined above and it doesn’t seem to help. The error I get for the setter tag is:
Error at line 3, character 100: Parse error. ‘}’ expected . I’ve played around with the “}” to no avail. Could you please help?
Thank you!
Pat
Hi Patrick,
Sorry for the issue. For some reason, WordPress inserts “pre” in brackets into the code. Remove that and the error should go away.
Please let me know how it works out for you.
Craig
Hi Craig,
Thanks for shating this! It is really helpful for people like me.
I am trying to tinker with the scripts to not count the pageviews but the sessions of a user. My goal is to alter a website when a visitor visits our site for the second time ánd has visited at least 4 pages. Counting the pages is easy following the steps above. But how can I count visits?
Is there a way of checking if the cookie is already set, then retrieving the data it was set originally and then calculate if that was at least 1 day and max 90 days ago? That would not actually acount the number of visits. But it would tell me a visitor was on the site before.
Any thoughts?
Hi Craig, thank you for this great article. I have a question related to UTM parameters. We work with a vendor who sends traffic to our site via his link. When you click on the link, you’ll be redirected to our landing page. At the end of the URL, there are UTM parameters for “subid” and “uid”. I have already created a tag for the postback with “campaignid={{subid}}&clickid={{uid}}” parameters. What we need to do to capture the values that are passed for those fields when a visitor reaches our site? Thank you!
Hi Ana,
I’m not sure I’m totally following what you’re saying. But if you’re asking how to create a cookie from the UTM parameters, couldn’t you just use Google Tag Manager to grab the UTM parameter? And then use the rest of the suggestion her to assign the value in that UTM parameter to a cookie?
Does that answer your question?
This is actually so helpful. Thanks for sharing, Craig!
Glad you liked it!